Okay, first up the money shot, so you can see that it works, then I’ll circle back and set out how I got there 
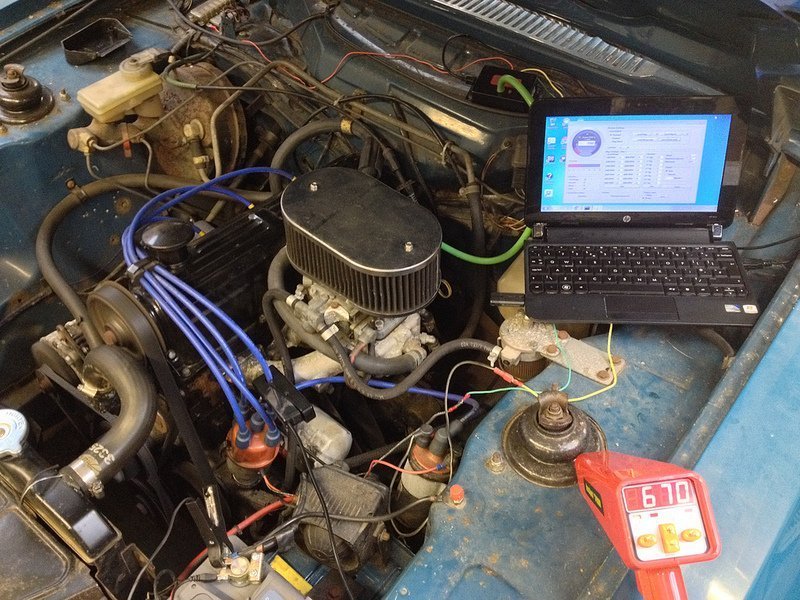
To set the scene, that’s my bog-standard 2.0 Pinto with an Aldon Amethyst unit (resting on the heater bowl) effectively inserted between the distributor and the coil, running a user-definable ignition advance curve with vacuum advance. I’ll be completely upfront, it’s no Megajolt/Megasquirt/1-2-3/whatever, as it only does ignition advance based upon RPM and load (which can be manifold vacuum, throttle position or turbo boost). You also get an app to run on your laptop to define your map(s), write them to the unit and get a real-time view of what’s happening when the engine’s running. Fairly simple then, however, for my anticipated needs it seems entirely adequate – though I’m willing to be proven wrong, as that’s what experimentation is all about.
For your money, you get the unit, a USB cable, a memory stick with the software & manual, some rubber rings and some resistors (if your wierdy-beardy setup needs them – mine didn’t)
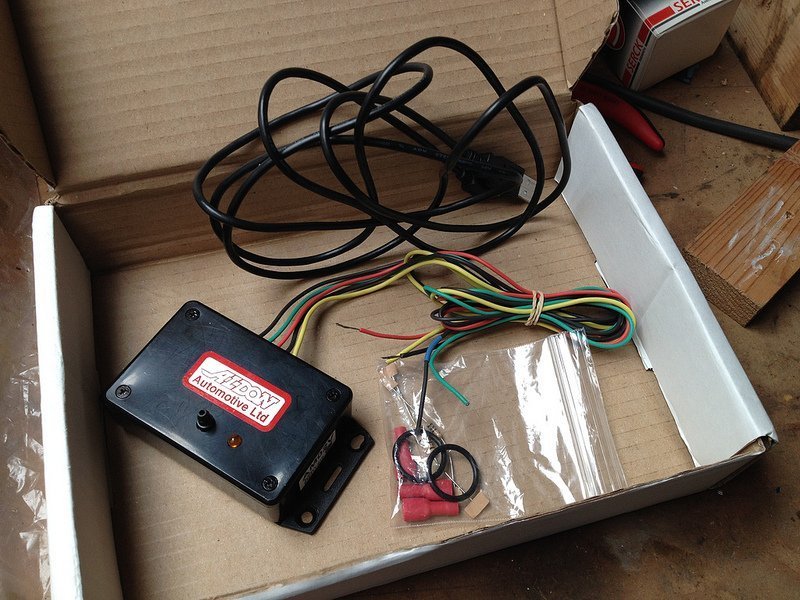
It works by taking the pulse signal from an electronic ignition system (in my case an Aldon Ignitor, though you could also use Lumenition or others) that’s been locked and set at TDC, and effectively adjusting the timing advance by varying the delay with which the pulse is sent to the coil based upon a lookup against RPM and load. It also factors in dwell, which is the formula that says the faster your engine’s going, the less time you actually have to burn the fuel on each stroke. Now this is all basic maths and some simple electronics and I actually could have built something myself to do the job, but here’s the rub …
- somebody else did it first
- they tested it
- they refined it
- they made it to work with the Aldon Ignitor that I’d previously spent seventy quid or so on to replace the points
- they sorted out isolating the power for the unit from the nasty, dirty signals you get in a car
- they wrote a simple little app for it
- they packaged it up in a box
- they made it as a 4 wire connection, with no need for me to go out and buy (then also fit) a trigger wheel, an EDIS controller, a crank sensor, a crank sensor mounting and a coilpack as well
- they made it for the same sort of price as you’d pay for a modified mechanical distributor (from Aldon, Bestek or a few others), that you can’t change later and which generally loses you the vac advance
- they sold a fair few at £180 or thereabouts
- somebody bought one for their kit car, changed their mind and sold it to me for considerably less
- they made it simple
So enough of the preamble, was it easy to put together and was it worth it? Erm, yes on both counts. 
The hardest part is actually locking the centrifugal advance in the distributor, so that the only thing in charge is the Amethyst. To do that, you open up the dizzy, remove the Ignitor unit (or whatever you’ve got), unhook the vac advance arm, remove the vacuum unit and then sit there for a while trying to work out how to remove the cover plate, beneath which sits the gubbins. Head scratching and googling eventually set me right, but what you have to do is push that bottom plate round clockwise about 45 degrees to free it from a couple of retaining channels cast into the casing, then slide a screwdriver in through the vac advance hole, under the cover plate and gently lever it upwards.
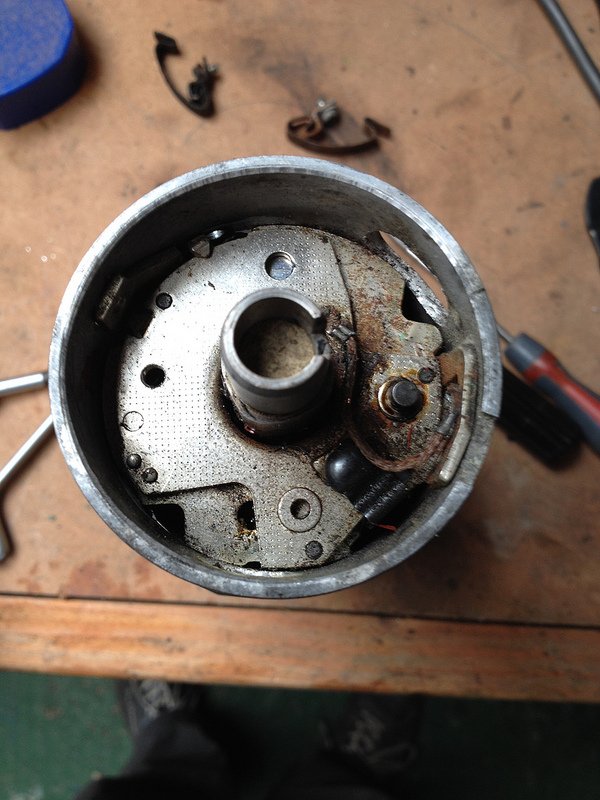
Once it’s off, you then need to remove the springs. This was also confusing, but like one of those challenges on The Adventure Game, if you think it through it works itself out. The inner end of each spring just unhooks over the post, but the outer ones are little bastards. First prise off the little access panel in the side of the casing, then rotate the shaft until the spring’s next to it. Then get a really small screwdriver and gently rotate that little retaining clip you can see on the top of the post that’s holding the end of the spring. Move it through about 270 degrees while wiggling the spring and it will come free. There may be an easier way, but that’s how I did it. 
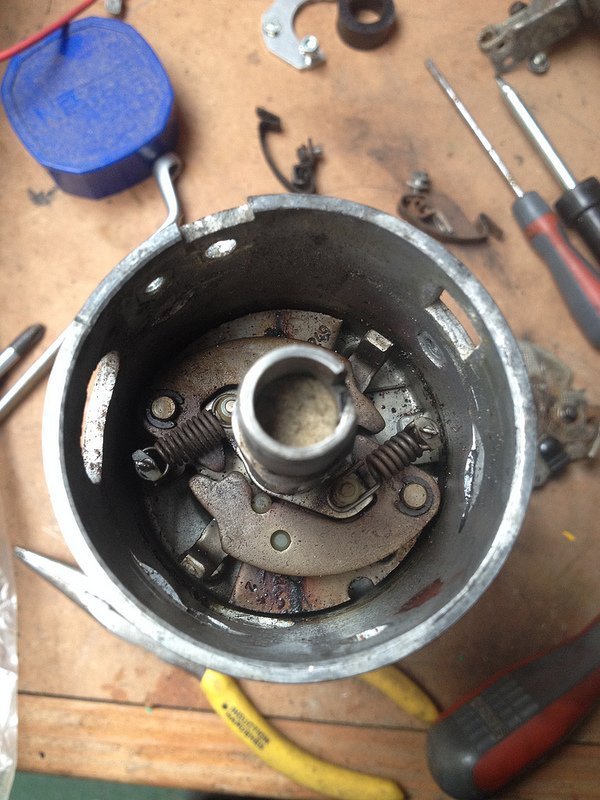
In olden times, you’d have then set about finding two new springs with different springiness to mechanically alter the advance curve, with the springs fighting against the weights under centrifugal force, rotating the shaft around and advancing the ignition. You’d probably also want to be adding a blob of weld on the stops, to prevent too much advance being added. The number of beardy men in overalls who know how to do this is diminishing on a daily basis, so instead we put the rubber rings around the posts to pull the mechanism to max (fixed) advance and deal with everything in software. How very modern 
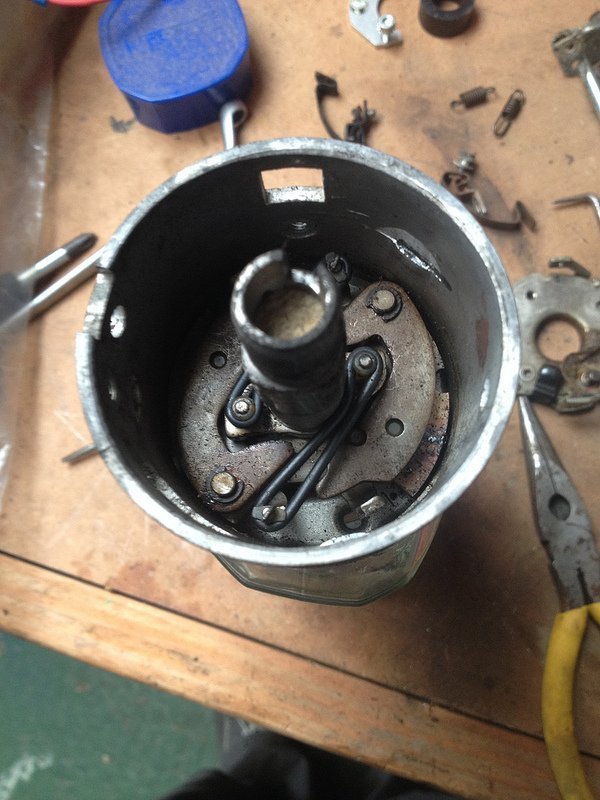
I’ll be honest here; those rubber rings are the whole bit I’ve got the least confidence in. They seem fine for now, but I’ll likely get it redone later with some stainless lock wire or something. You then put the dizzy back together, put it back on the engine, put power to the Amethyst unit and connect up the pulse output from the Ignitor. As you rotate the engine by hand, the LED on the top of the unit comes on as the “points open” and goes off as they “shut”. You turn the engine round until the timing mark on the crank pulley is at TDC, then rotate the dizzy until the LED goes out, at which point your dizzy is timed up to TDC and any advance is determined by the software. With a grand flourish of “what’s the worst that can happen, eh’?” you then connect the output from the Amethyst to the coil, cross your fingers and turn the key in the ignition. It’s ever so slightly anti-climactic when it just fires up and you don’t have to do the hours of fault finding that you’d mentally prepared yourself for.
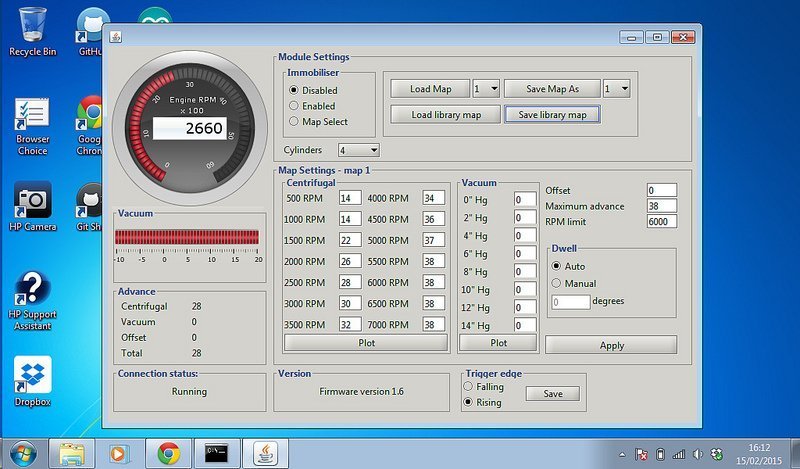
For now, all I’ve done is replicated the centrifugal advance curve that I measured the other day. When I go back to it next, I’ll add on some vac advance values when I’ve got a better idea of what they should be. As I get it back on the road and drive it, or continue down the path of bolting new bits on, the curve can be adjusted as necessary – either by me when I’ve been helped out by you good folks here, or by a bloke on a dyno. When I’ve worked out where best to mount it, I’ll plumb it in permanently and also wire in the immobiliser function.
Another thing I might do is adjust the dizzy to be timed at 10 degrees BTDC and use the offset feature in the software. That way, if the unit fails I’ve got a kind of “limp home” timing built in, like you’d get with an EDIS unit that didn’t receive a pulse from your Megasquirtyjolt 
So in a nutshell, am I happy so far? Yep  Fitted in an afternoon, does what it says on the tin, reasonably priced against my time and offers what I hope is enough flexibility for the future


 wow, great stuff
I was over the moon when I cranked for the first time and it ran………..
Please check with your system, still looking for one that’s correct working. Snap the throttle and check what’s happening with the spark on the flywheel. Ignition strobe set fixed, not calibrating TDC.
My friend is using MSD programmable and is working correct.
me: I’d seen – and discounted – the system you’re referring to, which is sold as the Accuspark Stealth Black Box over here. If memory serves, it’s about half the cost of the Amethyst, has no load input (only RPM) and I saw some horrible reports of it “forgetting” and corrupting a map between the map being uploaded and the ignition key being turned  This one’s a different kettle of fish, but I’ll bear all your comments in mind and see if I can find a way to give feedback on them with the limited test equipment I have to hand
me: Not at the moment, as the car’s not on the road yet so all I’d be doing is aimlessly revving the nuts off it and annoying the neighbours.Of course, I have been doing some of that anyway and never saw the ignition retarded beyond the base in the map. That’s just with a timing light and snapping the throttle as you suggested, so not very scientific.
me: Couldn’t find a third hand for a video, but with the timing light locked at zero and twisting the funk out of it to go straight from idle to WOT… I couldn’t see it retarding to my eye. The neighbours say thank you, by the way
Charliemouse: After about 100 wasted hours trouble shooting a 100% new build car / engine / ancillaries system , came to the conclusion that the Amethyst is the bucket of corruption in the system. Fitted a clockwork dizzy and no issues at all.Had massive retarding issues on rapid throttle opening, and random rev interpolation. Separated an shielded every wire, separately grounded every system, went to ridiculous lengths; hopeless.
My recommendation: don’t do it.
Simon BBC super helpful trying to sort BTW… Aldon not so – tech man always busy though does eventually sometimes call back.
